| BRP- Business resource planning. | Contact: nyberg@alliansedata.com |
| BRP is a planning system, for small Companies,
which can help to keep track of important tasks, appointments, projects and documents. BRP
offers easy and structured functionality to add and view this vital information. And if
you have planned your activities in BRP with required resources (persons & materials),
you can with little effort print out documents like inquiries, purchase orders,
quotations, order confirmations, invoices and reminders. In addition BRP will remind you
of the task & appointments. Or you can just use BRP as a personal system for planning, notes and reminders, which I do myself. |
Why use BRP:
What your company may obtain by using a planning system.
Functionality in BRP:
BRP Browser
In the BRP browser you can see the main Objects in BRP, that is Contacts, Companies, Projects, Tasks or Appointments and Document.
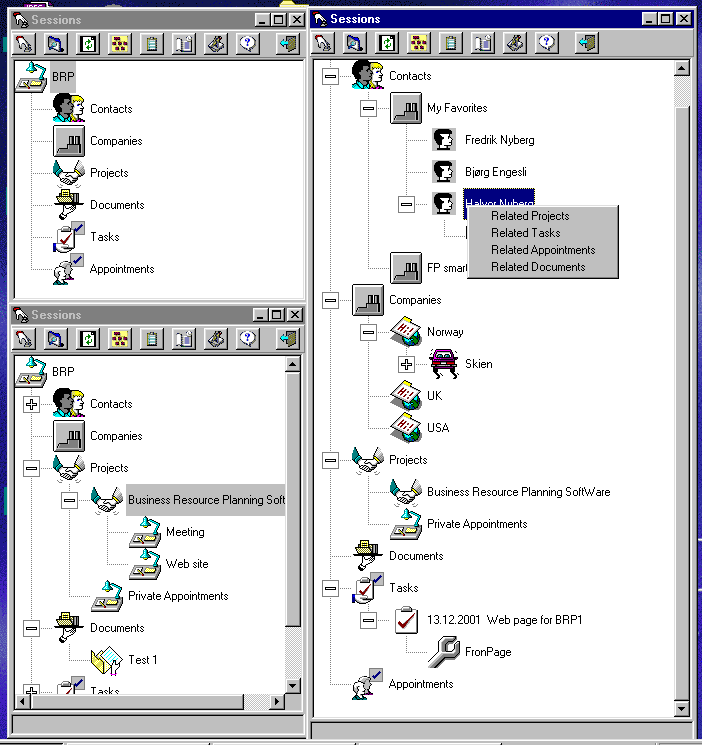
The Tree structure for the Objects is like this:
Contacts
Companies
Contacts in Company
Contacts are separated by Companies. Thus you also can have virtual companies to structure your Contact information, e.g. "Private Contacts".
Companies
Country
City
Companies
Contacts in Company
To avoid having all companies in one collection you have to first select Country and then the City, to get the Company. A requirement for a Company to be included in the BRP browser is that the Company has Status "High priority".
Projects are separated in Main Projects and Single Projects. The next level below the Main Project is the related Sub projects.
Projects
Main Projects
Sub Projects
Tasks/ Appointments
Location of Resources
Resources (Persons/Materials)
Single Projects
Tasks/ Appointments
Location of Resources
Resources (Persons/Materials)
A completed or cancelled Task and Appointment has the "x" symbol in the right upper corner of the Icon.
Tasks and Appointments are also visible in the first level. Here you only see not completed and not cancelled records.
Tasks
Tasks sorted by date
Location of Resources
Resources (Persons/Materials)
Appointments
Appointments sort by date
Location of Resources
Resources (Persons/Materials)
Documents
Document names
The Document module where the Document Object instances are created is a document management system.
The relations between Objects in BRP is like this:
Company -> Contacts
One Company can have several Contacts or Employees.
Projects -> Tasks/Appointment
One Project can have several Tasks or Appointments.
Contact->Tasks/Appointments, Projects, Documents
A Contact can be a resource for several Tasks and Appointments.
A Task or Appointment can also have several persons as resources.
A Contact that has the Project Manager Flag, can be responsible for Projects, Tasks, Appointments and Documents.
All Contacts and Companies can be Receivers of Documents.
Project/Task/Appointment -> Documents
A Project, Task or Appointment can have several related Documents in the document management module.
If you right click on an Object instance in the BRP browser you can easy get access to information about related Objects. For example right Click on a specific Contact instance (Contact Name) or Company instance, then you get a pop up menu where you can select to view Related Projects, Tasks, Appointments and Documents. The related instances will appear in the tree structure below the "parent" (Contact or Company).
You can relate files to the objects in the different levels of the BRP browser. Click on the "Relate file" button and the screen below will appear.
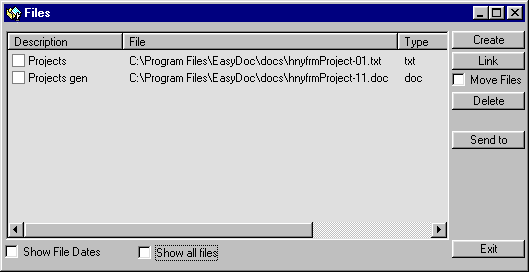
Here you can create a new file (MSWord, Excel, PowerPoint, Text file) or you can link an existing file (of any type). The files can be opened from this window by file association.
| New | Used to create a new MSWord, Excel, PowerPoint or Text file. |
| Link
|
Link a reference to an existing file. This file is
Copied to the BRP file area (specified in the Template setup. If you check the Move
option, the file will be moved instead of copied. Files may be dragged from Windows Explorer and dropped over the file list in BRP. By double-clicking the files they are opened in the associated application. E.g. XLS files are opened in Excel. Applications like Excel, Word, PowerPoint and AutoCAD are not started if they are already running. |
| Delete | Deletes the file reference and optionally the file. |
| Send To | Copies checked files to a specific folder. For example if you want to collect files for sending as attachment of an Email. |
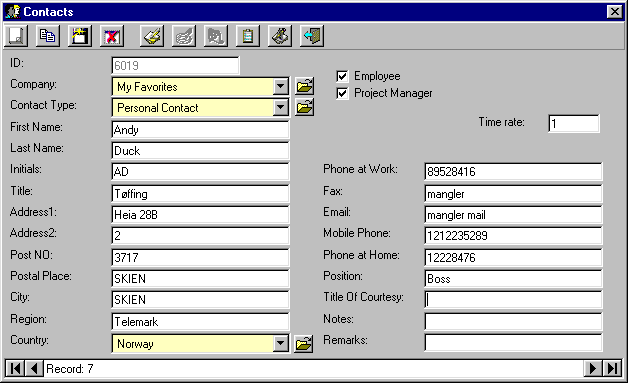
BRP contains Company and Contacts registers. One Company may have many Contacts and many addresses. To store several addresses for the same company, use the Company Name as First Name in the Contacts table, and the Type of address (e.g. Delivery) as Last Name.
The Contacts form looks like this:
Use BRP to organize your activities (tasks and appointments), then BRP will help you to keep track of the activities, and remind you when they starts.
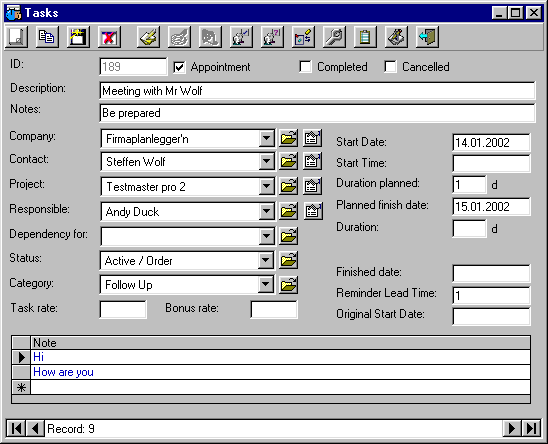
Figure: Activities, Task & Appointments
Both Tasks and Appointments are entered in the Task module. You can separate Appointments by checking the Appointment Check box. When referring to Tasks or Activities in this document, it means Tasks and Appointments.
All active Tasks that starts today minus days entered in "Reminder Lead Time" for the Task (in the Task module) are displayed in the Reminder window. In addition if the Task should have been Completed it is also displayed in the Reminder window. If the Start day of the activity is today, it is marked red.
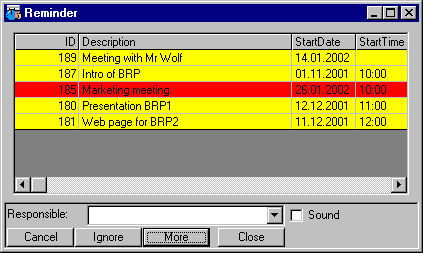
Figure Reminder.
In the reminder window you can choose to be reminded of task based on who is responsible, or you can view all reminders. If you close the window it will pop up after 60 seconds. If you Minimize the window it will not pop up, but be available in the background. You can select a Task and click Ignore if you don't want to be reminded of this Task once more (Ignore will be reset when restarting BRP). Click More if you want to see all information about the Task.
You can get a periodic overview of all Task and Appointments in the Activity Grid below.
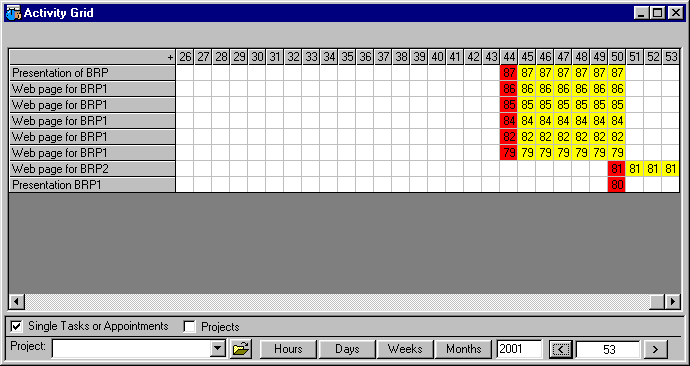
Figure Activity Grid.
Here you have the options to view by Hours, Days, Weeks and Months. Red colored cells shows the start time of the Task, while yellow cells shows the duration. You can type in the year and week or month in the boxes at the right lower corner. If you for example want to view Tasks by days for a specific week, you can click on a cell below the week number to activate the Week. Then click the Days button to view by Days for this week. To view more information about a Task, just double click one of the colored cells.
Resources for Tasks or Appointments
You can assign several resources to a Task or Appointment. The purpose is to control the requirements and the location (where the resource will be / are located). If the resource is not available then you can check it for Purchase. Then you can use BRP to print out Purchase order documents like Inquiries, Purchase orders and Reminders. You can also use BRP to print out Sales documents like Quotation, Order confirmation and Invoice. Records marked with the Sale flag can be printed on sales documents.
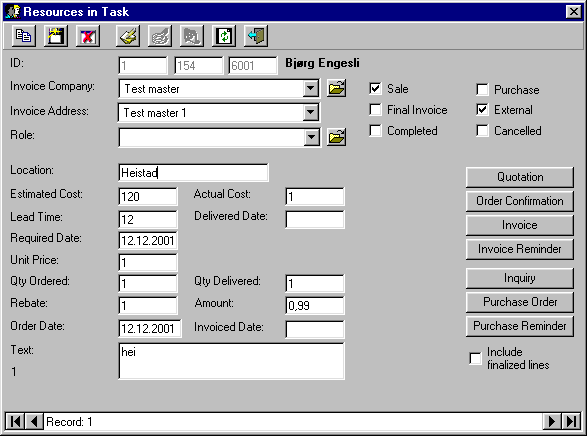
Figure: Resources in Task
When clicking on one of the "Order document" buttons, e.g. Quotation, the form in figure "Select Orderlines" will appear:

Figure: Select Orderlines
The records shown here is based on the following conditions from the "Resources in Task" form:
Invoice Company and Invoice Address are required.
If you selected a sales order document as Quotation, Order confirmation, Invoice or Invoice reminder in the form "Resources in Task", then all lines checked for Sale are shown.
If you selected a purchase order document as Inquiry, Purchase order or Purchase reminder in the form "Resources in Task", then all lines checked for Purchase are shown.
If you want to see all order lines independent of which task they belong to, check the "Show all" flag in the "Select Orderlines" form.
Check the lines you want to send to the document, and decide if it is a Final document (all records printed gets the Final Flag). Press Continue to print it out. Only set the Final flag if you are printing out a final Invoice or Purchase order. The Final flag is telling you that you are finished with printing the record to a document. But if you need to print the record later, you can reset the Final flag in the "Resources in Task" form, record by record. Or you can Check "Include finalized lines" before clicking one of the document buttons.
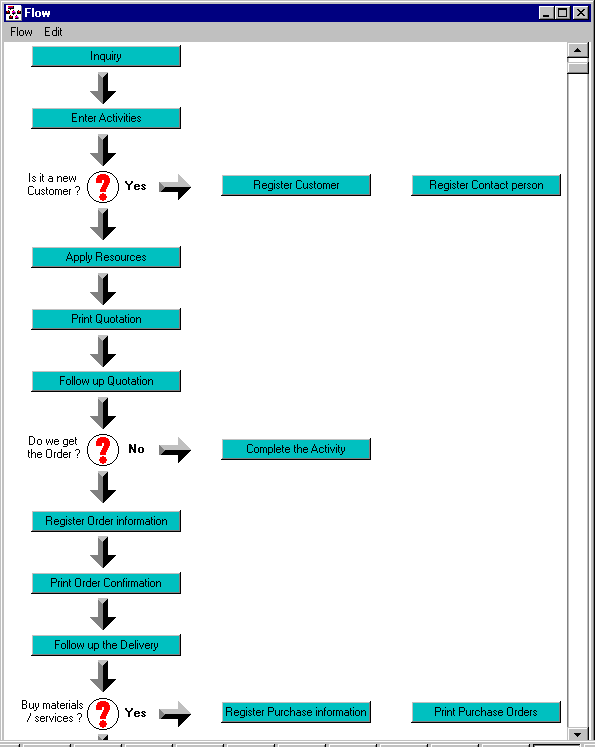
Control the Flow
It is possible to use BRP to Control the business flow and to Relate the flow to the modules in BRP. The Edit menu gives you access to maintain or add new flows. The saved flows are available below the Flow menu.
Understanding the Toolbar
The BRP Browser Toolbar
| Start - Starts the session or module related to the activated Object in the browser. Correspond to double clicking an Object. | |
| Find - Find a record in the browser tree based on input. | |
| Flow - Starts the Flow diagram viewer. | |
| Report - Prints a report if there is a report available for the selected object. | |
| Activity Grid - Shows the Activity grid with periodic views of Tasks and Appointments. | |
| Reminder - Shows the Reminder window. | |
| Files - View related Files, or Create New files. See Files. You can relate files to all kinds of objects in the Browser. |
Toolbars for the modules
It is important to understand that we operate in two different modes when accessing data in BRP. The modes we're referring to is Edit Mode which gives write access to the database and Search Mode that lets You browse the data. You have to be in Edit Mode when you want to add a new record, edit the current record or delete it. Edit mode is the default mode. In Search Mode we don't have write access to the data. You choose Search Mode when you want to find certain records based on ID, Company name, Template, Date etc.
Edit Mode
![]()
| New - Initializes for registering a new Record. | |
| Copy - Copy information from an existing record to a new. | |
| Cancel New - Cancels the new record operation. Appears only after New or Copy is chosen and until Save or Cancel New is done. | |
| Save - Saves the current record. If you have registered a new record, used Copy or edited an existing one, you have to save it to store the changes. | |
| Delete - Deletes the current record. | |
| Change Mode - Switch to Search Mode. | |
Search Mode
![]()
| Change Mode - Switch back to Edit Mode. | |
|
New Search Initializes for doing a Search. The operation actual done is clearing all fields and enabling the ID field for input. Then you have to type in words or pick items from combo boxes, to specify your search criteria. |
|
Find
After you have built the search criteria in the form, You need to push the Find button
to get the desired records. If you get a hit when using Find, all records matching
Your criteria's are displayed in a new Window. From here You may navigate to desired
record by double-clicking the row marker (located at the left side of each row) Seeking with Wildcards is supported in text boxes. If you want to Find all Companies that starts with the letter E, type E* in the Company text box. Finally press the Find button. |
Common Tools for both modes
| Report - Prints out a report. If You have done a search, the Report will be restricted to the search result. | |
| Files - View related Files, or Create New files. See Files. |
Tools for some modules
In the Task/Appointment module.
| Item to Task - Add an Item as a resource to the Task or Appointment. See Resources. | |
| Items in Task - Edit or View the Items that are resources for the Task or Appointment. See Resources. | |
| Person to Task - Add a Person as a resource to the Task or Appointment. See Resources. | |
| Persons in Task - Edit or View the Persons that are resources for the Task or Appointment. See Resources. | |
In the Document module:
| Open Doc - Brings up the related document in the Word processor. | |
| Merge - Creates a document in MS Word based on selected Template and registered information in the current record (like the address to the Receiver, subject etc.). |
In the Document module, you can see a "E"-button to the right of Task and Receiver Attention. This button makes it possible to select a Task or Receiver Attention from the ListBox.
Other Functions
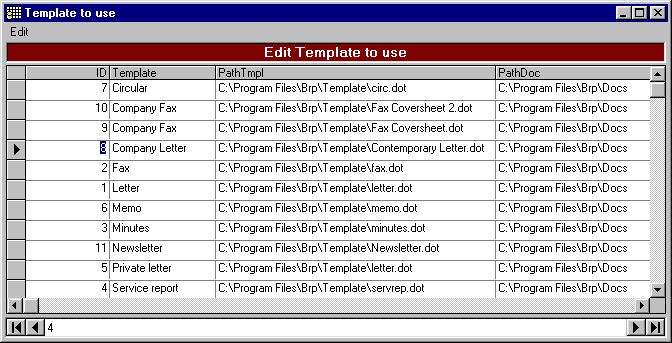
Figure: lookup tables.
Lookup tables like Document types, Templates, Status, Countries etc. are available from buttons on the right side of the Combo boxes. When the Look up button is clicked, the values are presented in a Grid. Navigating the cursor and Editing cells in the Grid, is pretty similar to navigating in a Spreadsheet program like Excel. To move the cursor to another cell, use the arrow keys. "Enter" or "Tab" may be used to place the cursor in the next cell. If you want to edit the cell, type directly in the cell. Undoing the last edit operation is obtained by pressing "Escape". To force a linefeed in a cell, press "Ctrl+Enter"
In the Document module, you can specify which values that are assigned to fields when a New record is initialized. E.g. you may use your own name as Responsible almost every time when registering a new record. To avoid typing this each time for new records, you can set a default value for the field. Set as Default Value by clicking the right mouse button at a text or combo box that you want to assign a default value for. The current text is saved as the default value. From this Pop Up, menu you can also Remove the Default Value.
Dates
Entering dates in a date field can be done by holding the Ctrl key down while pressing numbers. For example hold the Ctrl key down while pressing 0, the date of to day will be entered. Ctrl down while pressing 30 gives the date 30 days ahead.
IMPORTANT
If several users shall use BRP, it is important that each
client uses the database (unidoc.mdb) located on a shared network drive. Always install
BRP to a local drive. Manually copy Unicode.mdb to a shared network directory, and change
the Pointer in easydocs.ini. Remember to take regular backup of unidoc.mdb.
The very first time the client is started, you will be prompted for assigning
a database location (the path to the database file unidoc.mdb). You may need to change the
database location because you want to bring BRP with you on your Laptop, for viewing
purposes. To change the database location setting, stored in easydoc.ini, just delete
easydocs.ini from your windows directory. Next time you start BRP, you will be prompted
for assigning a database location.
When creating a New record a unique ID is automatically assigned. The new ID is an increment of the last assigned ID. Before you start to use BRP it is necessary to set the latest used ID's. Set Last Used ID is available by clicking the Flow button located in the toolbar of the BRP browser. Then select Setup from the Flow menu.
The Document module uses predefined
MSWord templates that are installed to the target directory (e.g. c:\Program
Files\BRP). Feel free to organize templates and paths to produced documents in folders as
it suits you. Check that the path information in the Template table is
correct according to where you want to store future produced documents and templates. The Template table is available in the Setup Flow (like "Set
Last Used ID's" above).
Good Luck!